When installing your ceiling fan, you may come across red wire along with black, white, and copper wires. What is this red wire for?
The red wire in a ceiling fan is typically used for connecting the fan’s light kit. It lets you control the fan’s light separately from the fan itself.
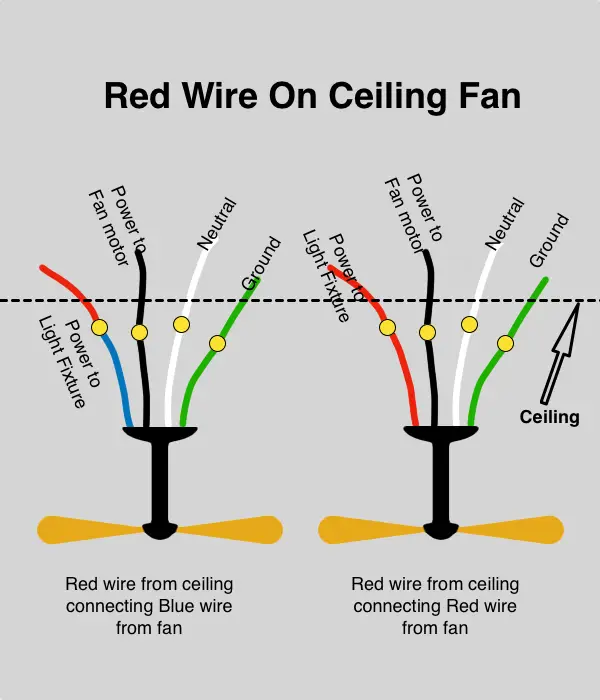
This red wire from the fan is connected to a corresponding red wire coming from the ceiling which connects to a wall switch. However, if the fan does not have a red wire, you should cap off the red wire from the ceiling without connecting it to anything.
Please note that sometimes, the light fixture wire coming from the fan and the corresponding one from the ceiling can be blue instead of red. This blue wire is connected the same way as the red wire would be.
Given below is a wiring diagram showing how the red light kit wire from the fan is wired.
How do you wire a ceiling fan with a red wire?
Connect the green wire from the fan to the ground wire in the ceiling box. Next, join the white wires and secure them with a wire nut. Next, attach the red wire from the ceiling to the red wire in the fan’s light. Then connect the black wire from the ceiling to the black wire in the fan’s motor and put the wires back into the ceiling box.
Where do you connect the red wire on a ceiling fan with a remote control?
If you have two wall switches and four wires, i.e., black, red, white, and bare, coming out from the ceiling you can install a ceiling fan with a remote and still be able to use the wall switches.
First, turn off the power at the breaker. Then, connect all bare conductors. Connect the white wire in the fan and the white wire on the input side of the remote receiver module with the white wire from the ceiling. Similarly, connect the black wire from the input side of the remote receiver module with the black wire from the ceiling. And connect the output black wire from the receiver module to the black wire from the fan.
Join the red wire from the fan with the blue wire on the output side of the remote receiver module and connect the input blue wire to the red wire from the ceiling. Don’t forget to cap off the white and black wires on the output side of the remote receiver module.
Now you can control the light with the remote when one of the switches is turned on. On the other hand, you can use the second switch to turn off or turn on the fan.
What if the ceiling doesn’t have a red wire
If there isn’t a red wire from the ceiling to connect with the fan’s red wire, you can join the fan’s red and black wires together, and then connect them both to the black wire from the ceiling.
This is done in cases where there is only one control switch. In this case, you won’t be able to control the light kit independently from the fan. Turning on the switch will turn on both the fan and the light simultaneously.
What is the function of different wires for a ceiling fan?
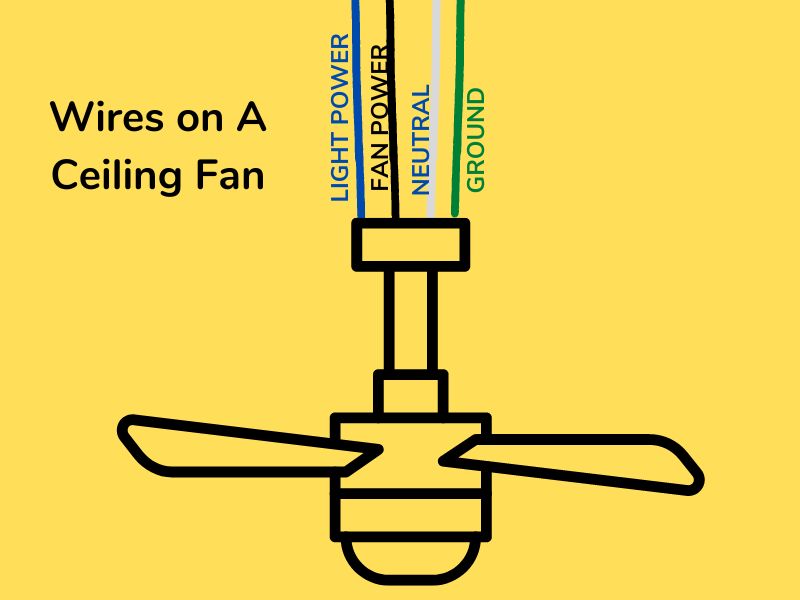
The hot black wire brings power from the wall switch. The green or bare wire serves as a ground wire that keeps the fan safe from power fluctuations. Red wire, if there is one, provides power to the light kit. Lastly, the white wire is neutral and helps complete the electrical circuit.
What does a red wire mean?
Usually, red wires are used as secondary hot wires. It means that they are live wires or conductors, so it’s important to mark them clearly to avoid any accidents by electrocution. In addition, red wires are often used when installing larger appliances such as dryers, stoves, and ceiling fans.
Final thought
Are you still wondering what color wire from the ceiling connects to which wire in the fan? Just match it up with what I have listed above. Before wiring anything up, double-check to turn off the power breaker. It will protect you from all kinds of nasty electrical surprises and fires, so check first!
Moreover, if you’re installing a new ceiling fan in an existing home, keep in mind that your ceiling box might not handle all those wires in the fan. Contact an electrician who can check out your ceiling box and make sure everything’s up to code if you have any concerns.