Ceiling fans are great for indoor and outdoor spaces. They typically come with 2 or more speed settings. But over time, a ceiling fan can slow down and deliver less airflow than it used to. This can happen even if you try running the fan at its highest speed.
A ceiling fan can spin slow even at its highest speed setting due to;
- Rust and dust build-up on the fan blades
- Lack of lubrication
- Pull chain stuck at the slow speed setting
- A bad capacitor
- A faulty fan control
Given below are 5 easy ways to fix a slow ceiling fan;
Clean and balance the fan blades
A slow ceiling fan can be made faster by properly cleaning it and ensuring that its blades are correctly balanced.
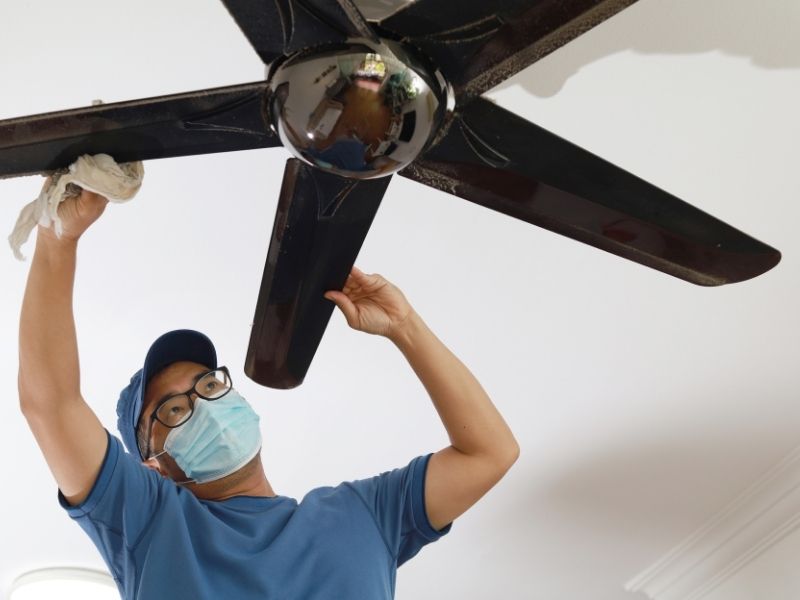
But how does a fan gets dirty and slow? Whether indoors or outdoors, there is always dust suspended in the air. When a ceiling fan runs, this dust settles on its blades. Depending on where you live and where the fan is installed, the fan blades can accumulate a lot of dust within a few weeks to months. These lumps of dust affect the aerodynamics of the fan blades and lower their efficiency. This increases the load on the fan’s motor and consequently slows down the fan.
The same thing happens with unbalanced blades. If a dry-rated fan is installed in a damp area, its blades will start to rust and cause the fan to run unbalanced. Blades can also be unbalanced when bumped against something or due to installing them in the wrong places. This counters the fan’s free movement and slows it down.
Cleaning the fan blades is a messy task if not done properly. The fan will start to spin and wobble when you try to clean it, not to mention the mess it makes on your floor. But there is an easy way to do this.
The best way to clean a fan’s blades is by using a pillowcase. Use a step ladder to reach the fan and slide one blade into the pillowcase. Wipe the blade’s top and bottom sides with it. The pillowcase will trap any dust falling to the floor. Once the blade is clean, repeat this process with the other blades.
The next step is to balance the fan properly. But unfortunately, if the blades are damaged due to them bumping against anything or warped due to weather conditions, they can’t be balanced. You will have to replace the blades in this case.
If the blades are not damaged, the fan can be easily balanced using a ceiling fan balancing kit. Such a kit consists of small weights and corresponding clip-on weights. The clip-on weights are randomly clipped to the fan blades to find which of them is unbalanced. Once the culprit is identified, the ideal location on the fan blade for minimum wobble is found out, and the weight is fixed permanently. Once balanced properly, your fan will be back to its normal speed.
Lubricate the fan
Another way to speed up a slow fan is to lubricate its bearings. As the fan runs, the oil in its bearings is spent. The lack of lubrication reduces the efficiency of the fan’s bearings, causing them to overheat and slow down the fan. By adding sufficient lubrication, a slow-running fan can be made faster.
If your fan is making noises when run, the lack of lubrication is the most possible reason for its slow speed.
How to lubricate a ceiling fan? Some ceiling fans come with oil ports. If yours have these oil ports, you can open them and add the lubricant. I recommend using a non-detergent lubricant (a 10 or 20W oil) (How to oil a ceiling fan) (How to oil a ceiling fan). Do not use WD-40 for this as it is not a good lubricant.
If your fan does not have an oil port, I recommend taking down the fan, removing its blades and light fixture, and adding the oil directly to the bearings on its two sides. Gently rotate the fan to and fro after adding the lubricant to make sure it is sucked into the bearings.
Once the bearings are well oiled, turn on the fan and see if it is running in speed.
Replace the pull chain switch
Many ceiling fans come with a pull chain switch to turn them on and off and adjust their speeds. Sometimes, this switch can malfunction and cause the fan to run at the same speed. This often happens due to the malfunctioning of a spring mechanism inside the pull chain switch.
The only solution here is to replace the pull chain. To do that, first, turn off the power to the fan. Then remove the light fixture on the fan if it has any. Removing the light kit will expose the pull chain switch. If the fan doesn’t have a light, unscrew the cover on its hub to access the switch. Then replace it with the new switch and re-attach everything. This should get the fan going faster than it was before. Here is a video showing the replacement of a faulty chain switch;
If you control the fan speed using a remote controller, make sure to set the pull chain switch to the highest speed setting. A remote controller can only regulate the speed within the limits of the pull switch’s speed setting. So if you set the pull chain switch to the lowest speed, you can’t increase the fan speed beyond that with a remote controller. This happens more often than you think and makes people wonder why their fan is spinning so slow.
Replace the capacitor
In 90% of the cases where a ceiling fan is slow, the culprit is the capacitor. A capacitor is used to provide a startup torque to the fan. It also helps to regulate the fan speed by regulating the current to it. When the capacitor is faulty, the fan loses part of the current to it. In some cases, the fan won’t even start.
Unfortunately, it is not possible to repair a capacitor. Even if this was possible, it is not worth the time or the money. So the best solution is to replace the faulty capacitor.
Before replacing the capacitor, it is important to get the right replacement product. The best way is to contact the manufacturer. Consulting the local store also works. Once you have the right capacitor, replace the faulty one with it. I recommend you do a quick search on youtube with the fan’s model details. You will likely find a capacitor replacement video of a similar fan. This will come in handy if you get stuck during the process.
A fan’s capacitor is usually in its hub. Just like replacing a pull chain switch, remove the cover at the bottom of the fan to access the capacitor. Remove the wires attached to it and replace it with the new capacitor. Reattach everything. Make sure that you cut the current to the fan at the breaker before starting the replacement.
Replace the speed controllers
Not all ceiling fans come with remote controllers or other control options. But many controller kits are available and people DIY them for their fans. However, some of these controllers may not be compatible with your fan model. In such cases, the controller’s ability to speed changes gets limited. It may not be able to correctly run the fan at all speeds. Sometimes there is only a marginal increase in the speeds between the two settings. And many times the fan works slower than it should be.
An example is a fan with solid-state controls. Such fans can only run at preset speeds like low, medium, and high. They cannot be controlled using a remote controller.
The only solution to this problem is buying the right controllers for the fan.
PS: I know many people using dimmer switches for ceiling fans. They work great for lights, however, they are not recommended for controlling ceiling fans. Even though these switches work, they can damage the fan in the long run.