The crawl space is perhaps the least used place in your home, so overlooking the issues there is pretty common. However, sometimes your crawl space may contain moisture or be filled with standing water, which, when left unattended, can lead to various severe problems. The solution – dry out the crawl space!
The basic steps involved in drying out a crawl space after a water leak or flooding are as follows:
- Identify the source of the water leak and fix the issue.
- Remove all standing water in the crawl space.
- Remove all remaining debris.
- Dry out the crawl space completely.
- Make repairs and replacements as needed.
In this article, you will learn about the causes of moisture or standing water in a crawl space, steps to follow to remove them, and other helpful information on the topic.
Common Causes of Water in a Crawl Space
Following are the common reasons that lead to the build-up of moisture or standing water in your crawl space:
Plumbing Leaks
Plumbing leaks are one of the most common reasons for moisture or water build-up in crawl spaces. The problem with plumbing leaks is that they are hard to identify, especially if your crawl space is full of dirt. And by the time you realize that there is a problem, there could be a vast amount of water already in your crawl space.
Foundation Cracks
While cracks in the foundation are typical to a certain extent, the problem arises when moisture from the soil around your home starts seeping in through these cracks. When water starts to enter your crawl space, its wood structures start warping, and mold develops, and the latter can be extremely harmful not just to your house but also to your health. Don’t forget, damaged wood structures can lead to expensive repairs.
Poor Foundation Grading
With proper foundation grading, the ground will slope away from your home, resulting in snowmelt and rainwater flowing away from your foundation. This helps protect the integrity of your foundation. However, when grading is done wrong, water will flow directly into your crawl space, leading to the build-up of standing water.
Will the Standing Water Drain on Its Own?
Unless you do something to get rid of the water in your crawl space, the standing water will not drain on its own. So, rather than waiting for a miracle to happen, put on your eye protection goggles, knee pads, and any other safety gear you need, because we are going to dry out your crawl space!
Steps to Dry Out a Crawl Space
The basic steps to dry out your crawl space are as follows:
Step 1: Locate the Source and Stop the Water
Before you start to dry out your crawl space, there are a few vital steps to be taken. The first obvious step is to locate the source of the water leak and try to stop it. Now, it doesn’t necessarily have to be standing water; even if it is just moisture in the crawl space that you are dealing with, identifying the source will help you eliminate the problem before it escalates and leads to more damage.
You can start by inspecting the foundation for any gaps or cracks. With time, your home’s foundation will start to develop cracks, through which moisture from the soil below can penetrate inside. While this water source cannot be shut down immediately, as you can with plumbing leaks, what you can do is have your crawl space or foundation inspected and maintained at regular intervals in the future.
If you notice that the water is coming from a leaking pipe, you can stop the water immediately by shutting off the main valve.
Step 2: Remove Any Wet or Damaged Items
Since chances are high that you might not notice the standing water or wetness in your crawl space initially, the next step is to remove any item in your crawl space that is wet or damaged.
No matter what the item is – insulation, vapor barriers, or anything else, remove it from the crawl space before you move on to drying the area. This is important because trying to dry out the wet space before removing these items can prevent the crawl space from drying thoroughly, and the remaining damp spots will result in rotting and mold growth.
Step 3: Remove the Standing Water
After all the wet and damaged items are removed from the crawl space, you can move on to removing the standing water. Before you leave to fetch a bucket, sponge, and a few rags, understand that doing this by hand can be extremely time-consuming and, therefore, ineffective.
So, what else can you do?
The best way to remove any standing water from your crawl space is to rent a wet-fry vacuum or pump. Of course, you can purchase one of these devices from your local hardware store if you think it will also be useful in the future. If not, renting would be wiser.
Of the two, using a pump is the quicker option. If your crawl space is larger than usual, you may have to use more than one sump pump to remove the water. While you can use a wet-dry vacuum to remove the water, it works slower than a sump pump, but definitely faster than the traditional method of using rags and a bucket.
You can also use a combination of both equipment; once you use the pump to get rid of the water from your crawl space, use the wet-dry vacuum to suck up any water left behind.
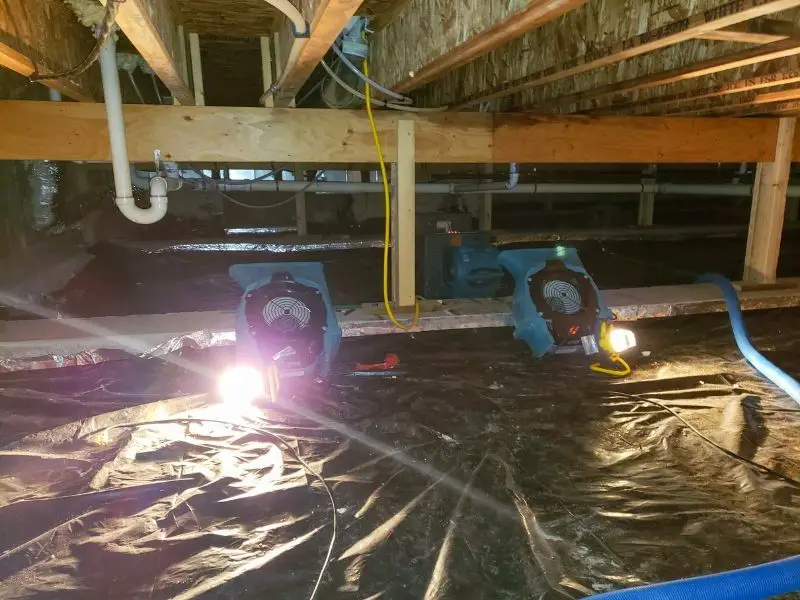
Step 4: Use Ventilation and Fans for Drying
Now that the water is gone, it is time to dry out your crawl space completely, because the walls, floor, and other areas are still wet. If you stop here thinking that the room will air dry on its own, you are risking mold formation and weakening your foundation, as even the smallest amount of moisture can lead to more hazardous circumstances.
The first thing you can do in this step is open any window, door, or vent to ventilate the crawl space. Then, place multiple large fans around the space to start with the thorough drying process (Here are some great floor dryer fans for this). Also, place dehumidifiers (more than one, if you can) at different spots to help with the drying.
Remember to let the fans and dehumidifiers run for multiple days to make sure that there is not a speck of moisture in your crawl space. Empty the dehumidifier reservoirs away from your foundation at regular intervals during this time.
Step 5: Inspect for Mold
As mentioned earlier, standing water and moisture can lead to mold formation in your crawlspace, which can be identified by inspecting the area after it is fully dried. So, after using the fans and dehumidifiers for drying your crawl space, inspect areas like ducts, piers, interior foundation, etc. for mold. If you find mold growth, clean up the area and use mold remediation products, like a mold remover spray, disinfecting spray, etc., to make the space mold-free.
Step 6: Make Necessary Repairs
Before rejoicing that your crawl space problem is sorted, you must perform all necessary repairs without delay to prevent the event from repeating itself. Look for holes, gaps, or cracks within the crawl space and repair them; check for damaged bricks, rotting wood, or any other structural damage and have them repaired.
Replace anything that you know is not valuable anymore; replace any wet insulation; walk around the space, both inside and outside, looking for damages, like cracks, roof damage, etc., and perform repairs and replacements on an emergency basis.
How to Prevent Crawl Space Water Damage
After successfully revamping your crawl space, it is crucial to ensure it remains dry. This means you need to take steps to prevent the entry of moisture or water into the space in the future. Here are a few things that can be done:
Use a Dehumidifier
If the humidity level in your crawl space always seems to be on the high end, it is wise to install a dehumidifier in the space permanently. This will help keep the humidity at a healthy level at all times.
Install a Vapor Barrier
If the surface of your crawl space is just a dirt floor, installing a vapor barrier will be amazingly helpful. This is typically a plastic liner that will cover the entire area of the crawl space and will prevent any moisture and/or vapor from entering the space from the soil below. As a result, you get to avoid moisture-related issues in your crawl space.
Crawl Space Encapsulation
If you know for certain that you are dealing with high humidity levels and ground moisture in your crawl space, then crawl space encapsulation could be the solution. In this process, a heavy-duty moisture barrier, usually thick plastic, will be installed on the floor and walls of the crawl space to create an airtight barrier that will keep moisture outside. This is a surefire way to avoid moisture- or water-related problems in your crawl space in the future.
FAQs
Will a wet/damp crawl space dry on its own?
No, your wet crawl space will not dry on its own, and if you don’t do anything to dry it out, it can lead to mold growth, rot, warping, and other serious damages. Depending on the size of your crawl space, use one or more large, heavy-volume fans and dehumidifiers to dry out the area thoroughly, after all the water is pumped out.
How much does it cost to dry a crawl space professionally?
Depending on the size of your crawl space, the extent of the damages, and the repairs and replacements involved, you can expect to spend anywhere between $1,500 to $10,000.
What can I do to prevent moisture build-up in my crawl space?
- One of the first steps to do to prevent moisture build-up in your crawl space is basement waterproofing.
- Seek professional help and have a vapor barrier installed.
- Have a dehumidifier permanently installed in the space.
- Use fans to dry the crawl space whenever necessary.
- Check for foundation damages at regular intervals, and fix any issue immediately.
- Opt for crawl space encapsulation for an effective solution.
Being a homeowner is a dream-come-true moment for everyone. But, the privilege comes with its own set of responsibilities and expenses. One such responsibility is keeping your crawl space in its optimum condition. Performing regular inspection and maintenance will enable you to alleviate any potential risks.
Additional reading: